




This guide is for Vendor Admins who are using the MDS Portal. It provides instructions on account creation and management as well as metadata statement management.
Refer to the FIDO Metadata Service page for general information about the Metadata Service. If your organization has not yet signed up for the MDS Portal, the person designated as the Vendor Admin (MDS Portal account admin) should visit the MDS Portal sign-in page to register an account.
Register Your MDS Account
Before you can use the MDS Portal, your organization needs to register for an account.
- Visit the MDS Portal landing page (https://mymds.fidoalliance.org/).
- Select Register.
- On the following screen, agree to the terms and conditions by selecting Agree & Continue.
- Use the form to enter your Account Information.
Note: A corporate email address must be used. Your email domain will be used to register your account within your company’s MDS Dashboard.
- Select Register.
- Check your email for confirmation and follow the included instructions.
Note: Subsequent users who register will only need to provide their Account Info.
Dashboard Overview
The MDS Portal Dashboard is the landing page for all users when they sign in to the MDS Portal. The dashboard provides access to all features of the MDS Portal and displays notifications for any outstanding items that require attention.
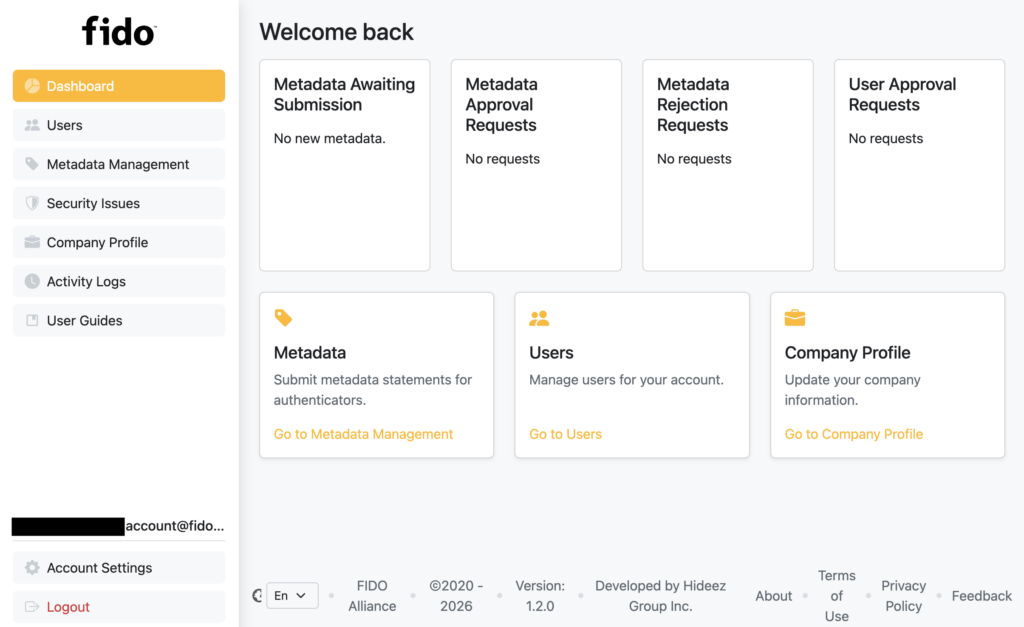
The following lists describe the features available on the dashboard.
- Dashboard: Access your account information.
- Users: View and manage the users who have access to your company account.
- Metadata Management: View your metadata statement files and add new ones.
- Security Issues: Use this form to notify the FIDO Alliance of any security issues pertaining to your products.
- Company Profile: Use this form to enter your company information.
- Activity Logs: View all activity for your company’s MDS account.
- User Guides: View the MDS Portal User Guides for detailed information on how to use the MDS Portal.
- Account Settings: View and edit your personal information and security settings, such as an email address and password.
- Logout: Select to sign out of your MDS account.
Notifications
The notifications section of your dashboard displays any outstanding items that require your attention. You can select each item to view more details and take action as needed.
- Metadata Awaiting Submission: Displays any outstanding metadata statements that have been submitted.
- Metadata Approval Requests: Displays requests that are awaiting approval.
- Metadata Rejection Requests: Displays metadata statement requests that have been rejected.
- User Approval Requests: Displays users who have requested access.
User Management
MDS Portal users can be added through self-registration or via invitation. The following table outlines when each method can be used.
| Registration Method | Vendor Admin | Vendor User |
|---|---|---|
| Self-registration | Only for the first user of this Vendor. | All users after the first self-register only as Vendor Users. |
| Registration via invitation | Only Vendor Admin can invite another Vendor Admin. | Only Vendor Admin can invite another Vendor User. |
Self Registration
- Visit the MDS Portal landing page (https://mymds.fidoalliance.org/).
- Select Register.
- On the following screen, agree to the terms and conditions by selecting Agree & Continue.
- Use the form to enter your Company Info and Account Information.
Note: A corporate email address must be used. Your email domain will be used to register your account within your company’s MDS Dashboard.
- Select Register.
- Check your email for confirmation and follow the included instructions.
Invite New User
After a Vendor Admin creates an MDS Portal account, they can invite other users from their organization to join the MDS Portal.
To invite a user:
- Navigate to the Users screen.
- Select Add new user.
- Enter the user’s email address.
- Select the Role you want to apply to this user. Refer to the table Permissions for User Roles for more information.
- Select Invite to send an email to the user or Cancel if you do not wish to proceed. The recipient should receive an email with further instructions to join the company MDS Portal.
The user immediately appears in the Users list with the role Vendor Admin or Vendor User and the status Invited. If the email is not received, you can request to resend it from the Users screen from the MDS Dashboard.
Permissions for User Roles
The following table shows permissions given to the available roles: Vendor Admin and Vendor User.
| Permissions | Vendor Admin | Vendor User |
|---|---|---|
| View dashboard | Yes | Yes |
| View and manage metadata | Yes | Yes |
| Report security issues | Yes | Yes |
| View and manage personal account settings | Yes | Yes |
| View and manage users | Yes | No |
| View and manage company profile | Yes | No |
| View activity logs | Yes | No |
- Select Invite to send an email to the user or Cancel if you do not wish to proceed. The recipient should receive an email with further instructions to join the company MDS Portal.
The user immediately appears in the Users list with the role Vendor Admin or Vendor User and the status Invited. If the email is not received, you can request to resend it from the Users screen from the MDS Dashboard.
To resend an invite:
- Navigate to the Users screen.
- Select the user to resend an invite to.
- Select Resend invite.
- In the pop-up window, confirm the user information matches the intended recipient and select Resend to send another email or Cancel if you do not want to proceed.
Approve User
New users must be approved by a vendor admin or an MDS Admin. Once a user accepts an invitation, if it is determined that an account request should not be approved, the request can be deleted. Vendor Admins can use the Invite function to add other Vendor Admins or Vendor Users from their organization.
To approve a user:
- Navigate to the Users screen.
- Choose the user you would like to approve.
- Select Approve.
- Verify the information on the pop-up is accurate and select Confirm to add the user or Cancel if you do not want to proceed.
Note: Once these steps are complete, the new user will appear on the users list, they can sign in, and their status displays as Active. The new user receives an email confirming the approval of their account.
Edit User
From the MDS Portal, you have the ability to edit user information, such as name, email address, and phone number. You can also change the role of a user, delete a user, or block a user from signing in to the MDS Portal.
Change User Role
Any Vendor Admin can change the role of a user to either Vendor Admin or Vendor User.
To change user role:
- Navigate to the Users screen.
- Select the user whose role you want to update.
- Select Change role.
- Ensure user information is up to date and then select either Admin or User.
- Select Confirm to make the change or Cancel to keep current settings.
- An email notification of this change is sent to the user.
Delete User
You can remove users and all data connected to their account when their account has one of the following statuses:
- Email not verified
- Not approved
- Invited
Warning: The user and all data connected to their account will be deleted. The user is notified via email about the rejection of their registration application.
To delete a user:
- Navigate to the Users screen.
- Select the user you want to delete.
- Select Delete.
- In the pop-up window, select Delete to delete the user or Cancel if you do not want to proceed.
For accounts with any other status, the user can only be blocked.
Block User
You can block any user with an Active status. A blocked user will no longer have access to any features of the MDS Dashboard and cannot sign in.
To block a user:
- Navigate to the Users screen.
- Select the user you want to block.
- Select Block.
- In the pop-up window, select Block to block the user or Cancel if you do not want to proceed.
The user receives an email that states their access has been blocked and they will no longer be able to sign in to the MDS Dashboard.
Admins will still be able to view the data connected to a blocked user. However, blocked users will no longer have access to any features of the MDS Dashboard and cannot sign in.
Reinstate A Blocked User
Any user with a status of blocked can be reinstated.
To reinstate a user:
- Navigate to the Users screen.
- Select the user you want to unblock.
- Select Reinstate.
- In the pop-up window, select Reinstate to grant access to the user or Cancel if you do not want to proceed.
Note: The user receives an email that states their account has been reinstated and they will be able to sign in to the MDS Dashboard.
View User
Vendor Admins can see all users registered under their company account. Vendor Users can only see their own account information. You can select any user to view their account information, such as name, email address, phone number, role, and status. You can also view the date they were added and the date of their last sign in.
Search for A User
You can search for users using the following fields:
- User name
- Email address
- Phone number
- Role
To search for a user:
- Navigate to the Users screen.
- Enter text in the Search bar to look up a user.
Note: Results start to populate immediately as characters are entered.
Filter Users by Fields
You can also use filters to find users.
Available filters:
- User
- Phone number
- Role
- Last Sign In From
- Last Sign In To
- Account Status
To filter users by fields:
- Navigate to the Users screen.
- Select Filters.
- Locate the fields you want to filter by and enter text or use the dropdowns to enter data.
- Select Apply filters to view results or Reset to clear all filters.
Reset Password and Passkey
Vendor Admins can reset the password and passkey for any user within their company account. This is a helpful option if a user forgets their password or loses access to their passkey.
To reset a user’s password and passkey:
- From the Dashboard, navigate to the Users screen.
- Select the user for whom you want to reset a password and passkey.
- Verify the entry matches the user you want to update.
- Select Reset password and passkey.
- Select Reset to reset the password and passkey or Cancel if you do not want to proceed.
You should see a confirmation message. The user receives and email with a link to reset their password and passkey.
Authenticator Certification and Validation
If you would like to obtain FIDO certification for your authenticator, start by contacting certification@fidoalliance.org.
- If you already have a FIDO Certified authenticator, start with the Request Certification Validation section.
- If you do not have a certified authenticator and do not plan to certify your authenticator, you can skip to the section on metadata management. FIDO Certification is an optional service and is not required for listing your metadata statement. However, certification does offer multiple benefits for the vendor.
Note: Submitting metadata statements for in-development or beta products is not recommended. If you plan to get FIDO Certification, it is recommended that you complete the certification process first, then submit the certified metadata statement to MDS.
Certification related to MDS only pertains to authenticator certification. For information about other types of FIDO Certification programs, refer to FIDO Certification.
Note: Please be aware that all certificates are being transitioned to CyberPass, FIDO’s new certification management and database system. Vendors with FIDO Certified Products will be notified once certificates are available in the database. You will be prompted to create CyberPass user accounts to manage both historical and future certifications. Please stand by for additional information. Preview CyberPass at: https://www.cyberpass.com/.
Request Certification Validation
Once certification is issued, you will receive acknowledgment of the level of authenticator. You should add new metadata statements. Once your statements are added and published, you can request certification validation. An MDS Admin will check to verify certification, add the level, and then update the report to certified if needed. This process applies to certification updates and upgrades as well.
As of MDS version 3.1.1, certification can be listed for:
- L1-L3+ authenticators
- Federal Information Processing Standards (FIPS)
After certification is validated, metadata statement records cannot be updated by vendors. If you submit a metadata statement prior to completion of certification, once certification is complete, contact certification@fidoalliance.org to request changes or to request updated certification to enforce policies.
To request certification validation:
- Navigate to the Metadata Management screen.
- Select the desired record.
- Select Validate Certification.
- Select Status Report or Biometric Status Report.
- Select the certification level from the dropdown.
- Select Continue to submit or Cancel if you do not want to proceed.
The MDS admins will receive your request and follow up with you as needed.
If your metadata statement was already published in the MDS Portal, once certification is complete, you must contact support@mymds.fidoalliance.org to request changes to your metadata statement or to request updated certification to enforce policies.
Once certification is issued, navigate to the MDS Portal landing page to add new metadata statements.
Metadata Management
The Metadata Management screen is available to Vendor Admins and Vendor Users. This screen displays a list of all published and unpublished metadata statements that have been added to the MDS Portal.
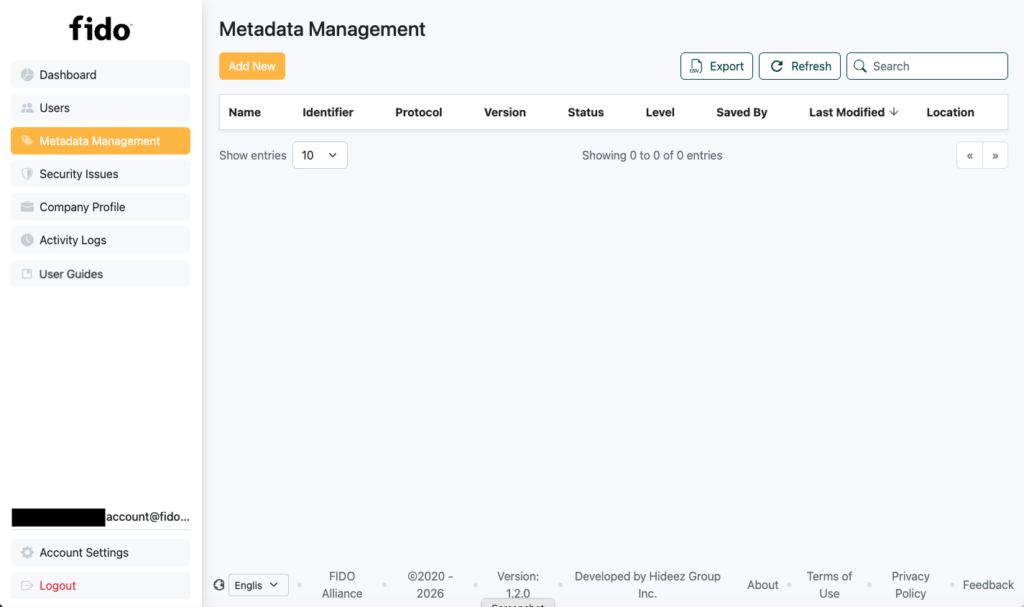
The following table lists the available statuses for metadata statements and the actions that can be taken for each status.
| Possible Statuses | |||||
|---|---|---|---|---|---|
| New | Requested | Approved | Published | Rejected | |
| Available Actions | |||||
| Add new | X | X | X | X | X |
| Publish | X | | | | |
| Cancel publish request | | X | | | |
| Edit | X | | | | X |
| Delete | X | X | | | |
| Update | | | X | X | |
| Show reason | X | ||||
Metadata Statements
You can add metadata statements for your authenticators to the MDS Portal. Once added, you can edit, delete, and publish your metadata statements as needed. Published metadata statements are included in the MDS BLOB and are available for relying parties to use for authenticator verification and (with the exception of an update to metadata statement details) cannot be edited or deleted by a vendor.
Metadata statements can be added to FIDO MDS for the following protocol types:
- FIDO2 CTAP: A communication protocol that dictates any communication between client (for example, browser OS) and a hardware backed authenticator (for example, security key)
- FIDO2 Non-CTAP: A protocol that is coupled with WebAuthn APIs and typically backed by a software authenticator
- UAF: A protocol that can be a local hardware or software component that uses biometric sensors to enable passwordless authentication
- U2F: A protocol that adds universal second factor added on top of a username and password
Note: Information on Key Attestation Format can be found on the W3C website.
View Sample Metadata Statements
You can view and edit the sample metadata statements in the MDS Portal.
To view a sample metadata statement:
- From your MDS dashboard, select the Metadata Management tab.
- Select Add New.
- Select one of the three samples: Sample FIDO2 CTAP, Sample FIDO2 Non-CTAP, Sample UAF, or Sample U2F. The metadata statement populates in the preview window.
You can edit the metadata statement in this window or copy and paste it into your code editor. To clear all text from the preview window, select Reset.
Add New Metadata Statements
There are two ways to add your metadata statement to the MDS Portal. You can either upload a .txt or .json file or copy and paste the code from your file.
Note: While it is not listed in the specification, the fields FriendlyName and Icon are currently required by the MDS system. This is a recent change that affects vendor metadata statements.
To add a new metadata statement by uploading a file:
- From your MDS dashboard, select the Metadata Management tab.
- Select Add New.
- Select Sample FIDO2 CTAP, Sample FIDO2 Non-CTAP, Sample UAF, or Sample U2F to view the required format for each file type.
- Copy and paste the sample into a .txt or .json file and add information for your authenticator.
- Select Choose File to upload the .txt or .json file.
- Use your OS to select and upload the file you want to use. The metadata from the file will populate in the preview window.
- Select Analyze.
- You will receive notification that the validation either passed or failed. If the validation fails, check your file for any issues.
- When validation succeeds, select Save.
- You should see a Success notification and the metadata statement displays within your list.
The metadata statement now appears in the Metadata Management list with a status of New. While in this status, the statement can be edited or deleted.
To add a new metadata statement by copying and pasting:
- From your MDS dashboard, select the Metadata Management tab.
- Select Add New.
- Select Sample FIDO2 CTAP, Sample FIDO2 Non-CTAP, Sample UAF, or Sample U2F to view the proper code format for each file type.
- If needed, select Reset to remove all code from the text entry box.
Warning: Selecting Reset will delete any code within the text box.
- Add information for your authenticator or paste your code into the text box.
- Select Analyze.
- You will receive notification that the validation either passed or failed. If the validation fails, check your file for any issues.
- When validation succeeds, select Save.
- You should see a Success notification and the metadata statement displays within your list.
The metadata statement now appears in the Metadata Management list with a status of New. While in this status, the statement can be edited or deleted.
Edit Metadata Statements
You can edit metadata statements that have a status of New or Rejected. With the exception of updating the attestation root certificate, the code for published metadata statements cannot be edited. You can update metadata statement details for published metadata statements.
Note: If you need to update a published metadata statement, you must contact support@mymds.fidoalliance.org to request changes to your metadata statement or to request updated certification to enforce policies.
Note: After certification validation, metadata statement records cannot be updated by vendors. Once certification is complete, contact certification@fidoalliance.org to request changes to your metadata statement or to request updated certification to enforce policies.
To edit a metadata statement:
- From your MDS dashboard, select the Metadata Management tab.
- Select the metadata statement that you want to edit.
- Select Edit.
- Edit the statement in the pop-up window.
- Set the Attestation Root Certificates by entering data in the Attestation Root Certificates field.
Note: Each authenticator must have a unique attestation root certificate.
- Select the checkbox next to the text I understand that change of Authenticator Version, and addition of the new Attestation Root Certificates can NOT be reversed.
- Select Update.
- You will receive notification that the validation either passed or failed. If the validation fails, check your file for any issues.
- When validation succeeds, select Save.
- You should see a Success notification.
The metadata statement now appears in the Metadata Management list with a status of New. While in this status, the statement can be edited or deleted.
Update Metadata Statement Details
You can update metadata statement details to edit certain details for published metadata statements. The fields you can update include friendly names, description, alternative descriptions, authenticator version, icon, logo, and attestation root certificates.
Note: Logos provide visuals for users of the BLOB. The icon is for the authenticator device. The providerLogo is the logo of the passkey provider. These fields can be the same if the vendor chooses.
To update a metadata statement:
- From your MDS dashboard, select the Metadata Management tab.
- Select the metadata statement that you want to edit.
- Select Update.
- Enter new data in the fields you want to update.
Note: Each authenticator must have a unique attestation root certificate.
- Read the notification that change of authenticator version, and addition of the new attestation root certificates can NOT be reversed and select the checkbox.
- Select Update or select Cancel if you do not want to proceed.
Update an Attestation Root Certificate
With the exception of updating the attestation root certificate, the code for published metadata statements cannot be edited. If your root certificate expires or is replaced, you will need to enter the new root certificate in the metadata statement.
To update an attestation root certificate:
- From your MDS dashboard, select the Metadata Management tab.
- Select the metadata statement that you want to edit.
- Select Update.
- Enter the new attestation root certificate in the Attestation Root Certificates field.
Note: Each authenticator must have a unique attestation root certificate.
- Enter any other new data in the fields you want to update.
- Read the notification that change of authenticator version, and addition of the new attestation root certificates can NOT be reversed and select the checkbox.
- Select Update or Cancel if you do not want to proceed..
Search Metadata Statements
You can search metadata statements using data from the following fields:
- ID
- Protocol
- Name
- Version
- Saved by
To search your metadata statements:
- From your MDS dashboard, select the Metadata Management tab.
- Select the Search box.
- Enter the text you want to use to search.
Results start to populate immediately as characters are entered.
View Metadata Statement Details
You can view the metadata statement, logos, and status reports for an authenticator.
- From your MDS dashboard, select the Metadata Management tab.
- Select the statement you want to view.
- Select Close when you are done.
Refresh the Metadata Management screen
To update your view to include any recent changes you can refresh the Metadata Management screen.
On the Metadata Management screen, select Refresh to update the records.
Delete Metadata Statements
You can only delete metadata statements that have a status of New.
Note: Published metadata statements cannot be deleted.
To delete a metadata statement:
- From your MDS dashboard, select the Metadata Management tab.
- Select the metadata statement that you want to delete.
- Select Delete.
Warning: Selecting Delete will delete the statement and all data contained within it.
- In the pop-up window, select Delete to remove the statement or Cancel if you do not want to proceed.
Publish Metadata Statements
Once your metadata statement is approved, you can request publication them so that it is available in the MDS BLOB.
To publish a metadata statement:
- From your MDS dashboard, select the Metadata Management tab.
- If you have not done so already, update your metadata statement fields Attestation Root Certificates and for U2F devices update the Attestation Certificate Key Identifiers.
- Select the statement you want to publish from the list.
- Select Publish.
- Read the Publish Metadata Statement and select Confirm to continue or Cancel if you do not wish to proceed.
- You will receive a Success notification that states that publication of the metadata statement was requested.
- An email will be sent to the MDS Admins for approval.
- Once the metadata statement submission is approved for publication, you will receive an email notification. If the submission is denied, you will receive an email with next steps.
- You now need to add the Attestation Root Certificates. To do so, select the statement you want to update.
- Select Update to edit the details contained within the selected metadata statement.
- Use the **Attestation Root Certificates** field to enter the certificates. Fill in with your data attestationRootCertificates (
attestationCertificateKeyIdentifiersonly for U2F).
Note: Each authenticator must have a unique attestation root certificate.
- Select the checkbox next to the text I understand that change of Authenticator Version, and addition of the new Attestation Root Certificates can NOT be reversed.
- Select Update when you are done or Cancel if you do not want to proceed.
The metadata status updates to Requested in the Metadata Management list.
The metadata statement goes back to MDS Admin for final approval. Once an MDS Admin approves publication, all vendor users (admins and users) receive an email notification that the metadata statement is approved.
The statement status updates to Published and displays on the Authenticators screen. At this point, the statement is added to the MDS BLOB.
Cancel Publication Request
For metadata statements with a status of Requested, you can request cancellation of the publish request.
To cancel a publication request:
- From your MDS dashboard, select the Metadata Management tab.
- Select the statement you want to remove from the publication queue.
- Select Cancel Publish Request.
- Select Confirm to cancel the request or Cancel if you do not want to proceed.
The statement is removed from the publication queue and the status reverts to New.
Export MDS Portal Records
From the MDS Portal, you have the option to export your records to a CSV file. For Vendor Admins, this feature is available on the Users, Metadata Management, and Activity Logs screens.
To export records:
- From the MDS Portal, select the screen you want to export data from.
- Select Export.
The CSV will generate and download to your device automatically.
Company Data
This screen is only available to Vendor Admins. Use this screen to view and edit your company information.
You can update the values for:
- Company name
- Website
- Company Email Contact
- Company Phone
Note: Typically, the company email domain cannot be changed. If extenuating circumstances require that the domain be changed, contact support@mymds.fidoalliance.org to request an update.
Security Issues
You can use the Security Issues tab in the MDS Portal to report any security issues that you come across. These include, but are not limited to, common vulnerabilities and exposures — anything with Common Vulnerabilities and Exposures (CVE) associated with it.
- From the MDS Portal, select the Security Issues tab.
- Use the Type dropdown to select the type of issue you want to report.
- User verification bypass: Indicates that malware is able to bypass the user verification. This means that the authenticator could be used without the user’s consent and potentially even without the user’s knowledge.
- Attestation key compromise: Indicates that an attestation key for this authenticator is known to be compromised. The relying party SHOULD check the
certificatefield and use it to identify the compromised authenticator batch. If neither thebatchCertificatenor thecertificatefield are set, the relying party should reject all new registrations of the compromised authenticator. The authenticator manufacturer should set the date to the date when compromise has occurred. - User key remote compromise: This authenticator has identified weaknesses that allow registered keys to be compromised and should not be trusted. This would include both, e.g. weak entropy that causes predictable keys to be generated or side channels that allow keys or signatures to be forged, guessed or extracted.
- User key physical compromise: This authenticator has known weaknesses in its key protection mechanism(s) that allow user keys to be extracted by an adversary in physical possession of the device.
- Other: Any other type of security issue not listed here.
- From the Authenticator dropdown, select the authenticator for which you want to report a security issue.
- In the Security Issue Details field, enter the information you want to provide.
- Select Send to submit the report.
Company Profile
You can view and edit information for your company on the Company Profile screen.
View Company Information
To view information for your company, navigate to the Company Profile screen.
Edit Company Information
To edit company information:
- Navigate to the Company Profile screen.
- Select the field you want to edit.
- Enter the new information.
- Select Save.
Activity Logs
The Activity Logs screen displays all actions users within your company have taken within the MDS Portal.
Actions Logged
List of logged actions associated with the user:
UserLoggedIn: User logged in to the server.
UserLoggedOut: A user logged out of their account or closed the browser tab on which the server was opened.
ForgotPassword: The user initiated the Forgot password option during authorization and was sent a link to reset their password.
UserRegistered: The user successfully completed all registration steps.
AddedNewUser: The vendor sent an invitation to a new user.
ResendUserInvite: Invitation was re-sent to new user.
UserRegistered: User successfully registered under the vendor account.
UserConfirmed: A user who registered independently was confirmed by an admin user.
RoleChanged: A user’s role was changed and the user who made the change is indicated.
DeleteUser: A user was deleted and the user who made the change is indicated.
DisableUser: A user was blocked and the user who made the change is indicated.
EnableUser: A user was unlocked and the user who made the change is indicated.
List of logged actions associated with the account:
AccountInfoUpdated: The user changed the First Name, Last Name, or User Phone data. The old and new values as well as the user who performed the action are indicated.
AccountEmailUpdateRequest: The changed their email in the profile settings and an email was sent with a confirmation link.
AccountEmailUpdated: Email address was successfully changed.
AccountPasswordUpdated: User successfully changed their password.
AccountPasswordReset: The user selected the link in the password reset email and entered a new password.
Metadata Management Logs
List of logged actions related to metadata statement management:
- PublishedMetadata: The vendor sent a request for the publication of a metadata statement.
- AddedNewMetadata: Metadata statement added by vendor.
- EditedMetadata: Metadata statement edited by vendor.
- DeletedMetadata: Metadata statement removed by vendor.
- MetadataPublished: Metadata statement published.
- MetadataPublishRequestCanceled: Request to publish a metadata statement canceled.
- ApproveMetadataRequest: Request to publish a metadata statement is approved by MDS Admin.
- RejectPublishRequest: Request to publish a. metadata statement rejected by MDS Admin.
- MetadataUpdated: Metadata statement updated.
Activity Logs Screen Available Actions
The following actions are available on the Activity Logs screen to help you manage and navigate the logs.
Export: Select to download a CSV file of your activity log.
Refresh: Select to update the current view.
Filters: Use the filters to refine the log view.
Search: Enter text to search the log records.
Search Activity Logs
You can search the activity logs by User or Authenticator names.
Results start to populate immediately as characters are entered.
Filter Log Records
You can also use filters to view the activity logs.
Available Filters
- Date From: pull logs after this date
- Date To: pull logs prior to this date
- User Email: filter by user email
- Action: filter by user action
- Authenticator: filter by a listed authenticator
- Interaction: filter by interaction
- Description: filter by log description
To filter records by fields:
- Navigate to the Activity Logs screen.
- Select Filters.
- Locate the fields you want to filter by and enter text or use the dropdowns to enter data.
- Select Apply filters to view results or Reset to clear all filters.
Account Settings
From the account settings screens, you can view and update your personal information, change your password, and manage your passkeys.
Personal Info
On this screen you can view and update personal information related to your account.
To update your name or phone number:
- Navigate to the Account Settings screen.
- From the Personal Info tab, select the field you want to update.
- Enter the new name or phone number.
- Select Save to update your information.
To update your email address:
Note: A corporate email address must be used. The new email domain must match the domain for the current email address.
- Navigate to the Account Settings screen.
- In the New Email field, enter the new email address.
- Select Change to update your information.
Security
On the security screen, you can manage passwords and passkeys for your account.
Change Password
To change your password:
- Navigate to the Account Settings screen.
- Select the Security tab and locate the Change Password section.
- In the Current Password field, enter your current password.
- In the New Password field, enter your new password.
- In the Confirm New Password field, enter your new password again.
- Select Save to update your information.
View Passkeys
To view your passkeys:
- Navigate to the Account Settings screen.
- Select the Security tab.
The Passkeys section lists all passkeys you have registered with your MDS Dashboard account.
Add A Passkey
It is a good idea to have more than one passkey registered to your account in case you lose access to one of them.
To add a passkey:
- Navigate to the Account Settings screen.
- Select the Security tab.
- In the Passkeys section, select Add passkey.
- Follow the prompts to register a new passkey.
Note: If the you get a prompt to create a passkey with the same service you used to register a previous passkey, you may need to select Cancel to trigger the option to choose where to store your new passkey.
Edit Passkey Name
To edit a passkey name:
- Navigate to the Account Settings screen.
- Select the Security tab.
- In the Passkeys section, find the passkey you want to edit and select Edit.
- Enter the new name for the passkey.
- Select Save to update the passkey name or Cancel if you do not wish to proceed.
Delete A Passkey
If you have registered more than one passkey, you can delete any passkeys that you no longer want to use.
Note: You must have at least one passkey registered to your account. If you need to delete a passkey, you must register a new passkey before you can delete the old one.
To delete a passkey:
- Navigate to the Account Settings screen.
- Select the Security tab.
- In the Passkeys section, find the passkey you want to delete and select Delete.
- Select Delete to update the passkey name or Cancel if you do not wish to proceed.
Change Password
To change your password:
- From the MDS Dashboard, navigate to the Account Settings screen.
- Enter your current password in the Current Password field.
- Enter your new password in the New Password field.
- Enter your new password in the ConfirmNew Password field.
- Select Save to update your password.