Get Started
Through this research, we identified the three most successful places to prompt users to create a passkey. Get started with our condensed UX and content principles, plus helpful tools. Then, keep reading the detailed guidelines for four common user journeys.
UX principles
Ten UX principles to get
your website started
with passkeys.
Content Principles
Three content principles
made specifically for
content strategists.
Detailed guidelines and resources
UX principles
1. Prompt to create passkeys alongside account-related tasks.
When people are already in an account management mindset—such as, account creation, account recovery, or as part of account settings—they are more likely to perceive the option to create a passkey as a relevant enhancement to their site experience, rather than an unwelcome interruption or barrier to accomplishing other core site tasks, such as shopping. Prompting to create passkeys during the sign in experience didn’t perform as well.
2. Associate the unfamiliar (passkeys) with the familiar.
Passkeys are a new term, a new visual symbol, and a new authentication method for consumers. Whenever possible, help them understand the nature and value of passkeys by associating them to familiar concepts, visuals, and experiences. For example, biometric experiences are familiar.
3. Use proven passkeys messaging and icons before and after OS dialogs.
Before triggering the passkeys OS dialogs, display passkeys messages, icons, and actions related to the status of the current task. After the passkeys OS dialogs are completed or dismissed, show the resulting status of the task using messages and icons. This provides a “handshake” between the relying party (RP) website and the OS dialogs and clarifies how the OS and RP are working together to optimize account access and security through passkeys which helps build people’s trust and interest in the new concept of passkeys.
4. Allow freedom and choice related to passkeys.
For consumers to remain in control of their experience and to engender trust with your brand, provide clear options related to creating and managing passkeys. Allow them to create accounts with or without a passkey. Allow them to create a new password upon password reset or create a passkey instead.
5. Follow accessibility principles before and after the use of passkeys.
Passkeys are most accessible when they are presented to users in ways that they can perceive, are operable using assistive technologies, and are understandable to users with a variety of functional needs throughout workflows in their journey with passkeys. Comply with accessibility guidelines such as the Guidance for Making FIDO Deployments Accessible to people with Disabilities and the underlying Web Content Accessibility Guidelines (WCAG).
6. Use a passkey hero prompt consistently across the customer journey.
Create a “hero” for passkeys which includes specific symbols, headline, messaging, and call to action. Consistently use the full hero content at account-related moments in the customer journey. For example, use the complete hero versus using only a “Create passkey” button.
7. Persist helpful information about passkeys.
Keep helpful information about passkeys in the human interface, without requiring additional clicks to see it. For example, retain the passkey “what”, and “where” messages in the hero messaging in account settings even after a passkey is created. Display the text by default and don’t hide it beneath extra clicks. Here’s another example: because people should be given the choice to disable passkeys, but they may not understand how they’ll sign in without them, place the short description of what disabling passkeys will do next to the “Disable passkeys” link. Persist this description in the human interface. For example, don’t put this information in a tooltip that is exposed only upon hover.
8. Make passkeys a primary option in account settings.
Match the display and interaction model for passkeys with that of other authentication items such as username, password, or 2FA within a person’s Account Settings. For example, if other sign in options within Account Settings are labeled with an H2 heading, then label “Passkeys” with an H2 heading, too.
9. Display “passkeys cards” with meaningful content to give shape to passkeys.
Unlike passwords, which are tangible combinations of letters, numbers, and symbols, digital passkeys are largely invisible to people. Display a passkeys card affordance in Account Settings. Inside the card include the passkey icon, messaging, and options that inspire trust and reassures people that their passkeys are active, available, and manageable. If someone has two or more passkeys, each passkey has its own card.

10. Plan your UX in accord with your unique security and business needs.
The guidelines focus on UX concepts that are unique to FIDO with synced passkeys. You will see various forms of identity proofing and non-FIDO authentication examples throughout this work. The guidelines do not intend to prescribe security guidelines for identity proofing or other non-FIDO authentication mechanisms as they are unique to each RP and based on their own unique business needs and security policy. Throughout the guidelines, look for this symbol [ i ] which indicates where your own security policy and business drivers come into play.
Content principles
How do our UX principles apply to content design and strategy? We’re highlighting these three key principles to guide your passkeys content. We’ve also included recommendations showing the language we used in our research. You can borrow the exact content we tested or adapt it to fit your company’s style, voice, and tone.
1. Pair passkeys language with wording they know.
Passkeys are a new concept for many users. Help them understand the value of this new sign-in method by showing how passkeys relate to other methods they already use. For example, “With passkeys, you don’t need to remember complex passwords” or “Passkeys are encrypted digital keys you create using your fingerprint, face, or passcode”.
2. Use clear “handshake” messages before and after OS dialogs.
Help your users feel confident about the OS passkey experience with clear “create account” or “create passkey” messaging before the OS dialog and a confirmation or success message after. This reassures users that your company is working hand-in-hand with the OS to protect their account with passkeys.
3. Use passkey messaging throughout the customer journey.
Use passkey prompts and information across multiple areas of your experience and interface to encourage users to try passkeys at account-related moments in the customer journey — account creation, recovery, and settings. This could range from clearly labeled “create passkey” buttons to detailed “why”, “what”, and “where” passkey messaging.
Content recommendations
Create account
Copyable content and re-usable design assets for these screens are available in the FIDO Alliance Figma UI Kit.
Account Recovery
Copyable content and re-usable design assets for these screens are available in the FIDO Alliance Figma UI Kit.
Account Settings
Copyable content and re-usable design assets for these screens are available in the FIDO Alliance Figma UI Kit.
Helpful Tools
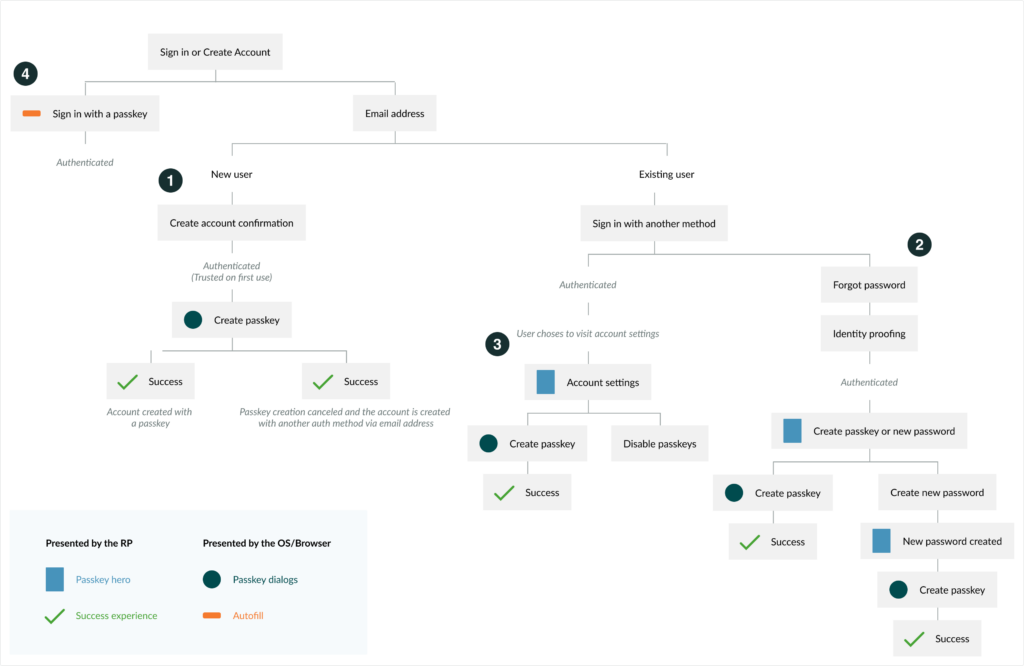
Passkeys UX architecture diagram
The passkeys UX architecture diagram represents the four user journeys contained in the guidelines.
- User journey 1: create a new account with a passkey
- User journey 2: create a passkey and/or a new password during account recovery
- User journey 3: create, see, and manage passkeys in account settings
- User journey 4: sign-in with a passkey
Get the source file in the FIDO Alliance Figma UI Kit
Demo Video
Figma UI Kit
The FIDO Alliance Figma UI Kit is a collection of ready-to-use UX components and content. The source files for all the experiences in these guidelines can be found in the UI Kit, including passkeys icons, passkey OS dialogs, and more. Use it to jump start your passkeys UX.
https://fidoalliance.org/design-system/ui-kit/
Detailed guidelines organized by four user journeys
The detailed guidelines take you step-by-step through four user journeys for passkeys.
- User journey 1: create a new account with a passkey.
- User journey 2: create a passkey and/or a new password during account recovery.
- User journey 3: create, see, and manage passkeys in account settings.
- User journey 4: sign-in with a passkey.
User journey 1: create a new account with a passkey.
UX Goals: Allow people to create new accounts with a passkey (no password).
- Allow people to create a new account with an identifier and a passkey (no password).
- Include fallback authentication method(s) based on your security policy and business needs.
- Decrease account creation times for RPs by increasing passkey creation success.
- Reduce account recovery concerns as passkeys may be synced across a platform cloud to enable passwordless sign-ins across the user’s devices.
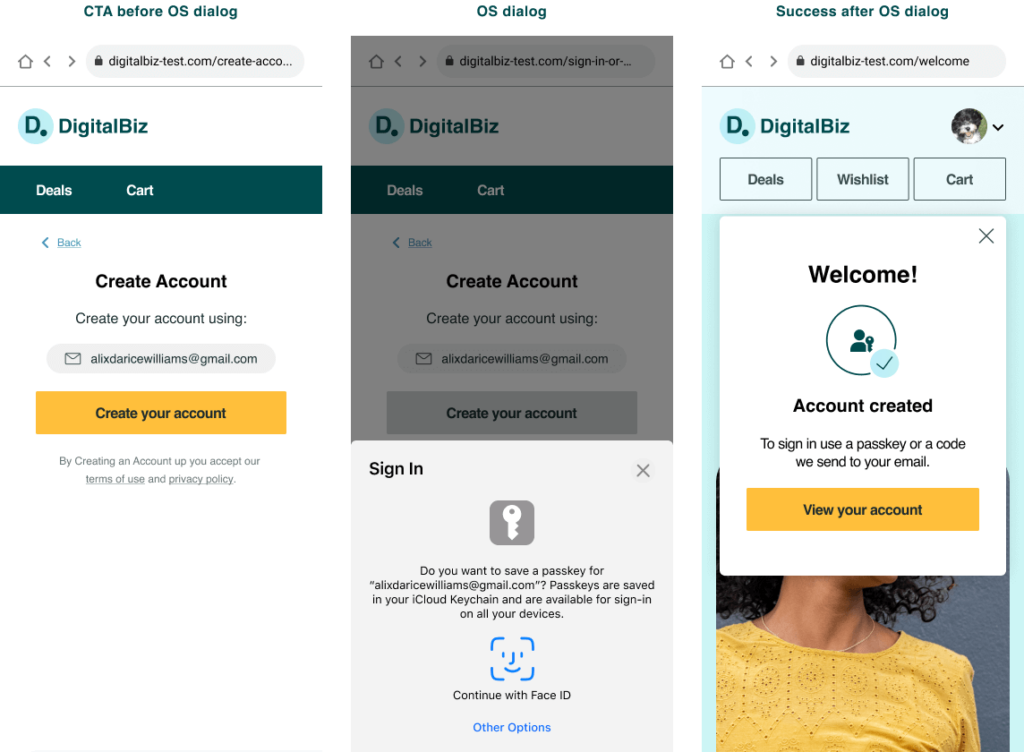
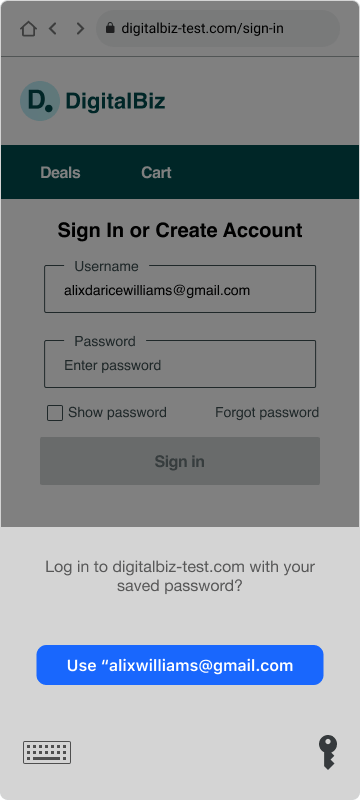
Step 1: Select the “Sign in or create account” button.
On the homepage, when people are in an unauthenticated state, display a single, discoverable call to action to sign in or create a new account.

Key Learning: On the homepage, offer one affordance for both sign-in and account creation when people are in an unauthenticated state.
Evidence
The research indicated that the action of creating an account was more discoverable on DigitalBiz when the sign-in and account creation options were combined, rather than surfacing the account creation option after people opted to sign in. In addition, some participants reported that occasionally they are uncertain whether they have an account, and a multipurpose button serves their needs.
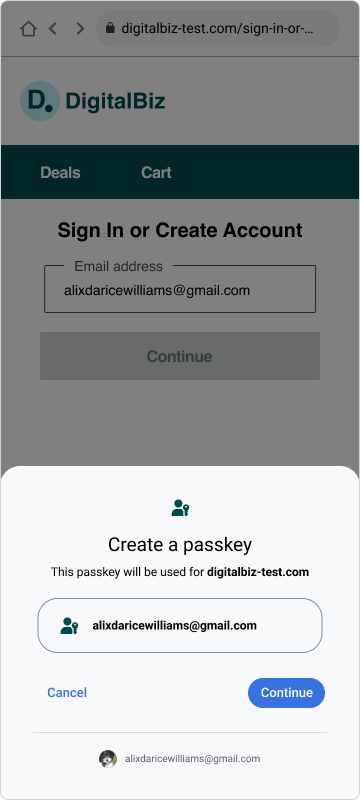
Step 2: Enter an identifier (email in the case of DigitalBiz) to “Sign in or create account.”
After a person selects the “Sign in or Create Account” button, display a page with the headline “Sign in or Create Account,” with an editable text field titled “Email address,” filled with the instructional text, “Enter email address” as a call to action to begin signing in or creating an account. Before people enter a valid email, display an action button titled, “Continue,” in an inactive state to emphasize that entering an email is the first step to signing in or creating an account. If they entered a valid email address, display the “Continue” button in an actionable state. If the email is not recognized by your systems, create a new account associated with the email address entered.

Key Learning: Eliminate the password field.
Evidence
The research indicated that beginning both the sign-in and account creation processes with only a prompt to enter an email address (no password field) helped foster the perception that account creation and signing in with a passkey are simple and short processes that do not require passwords. This practice is sometimes referred to as an “identifier-first” approach or “home realm discovery.”
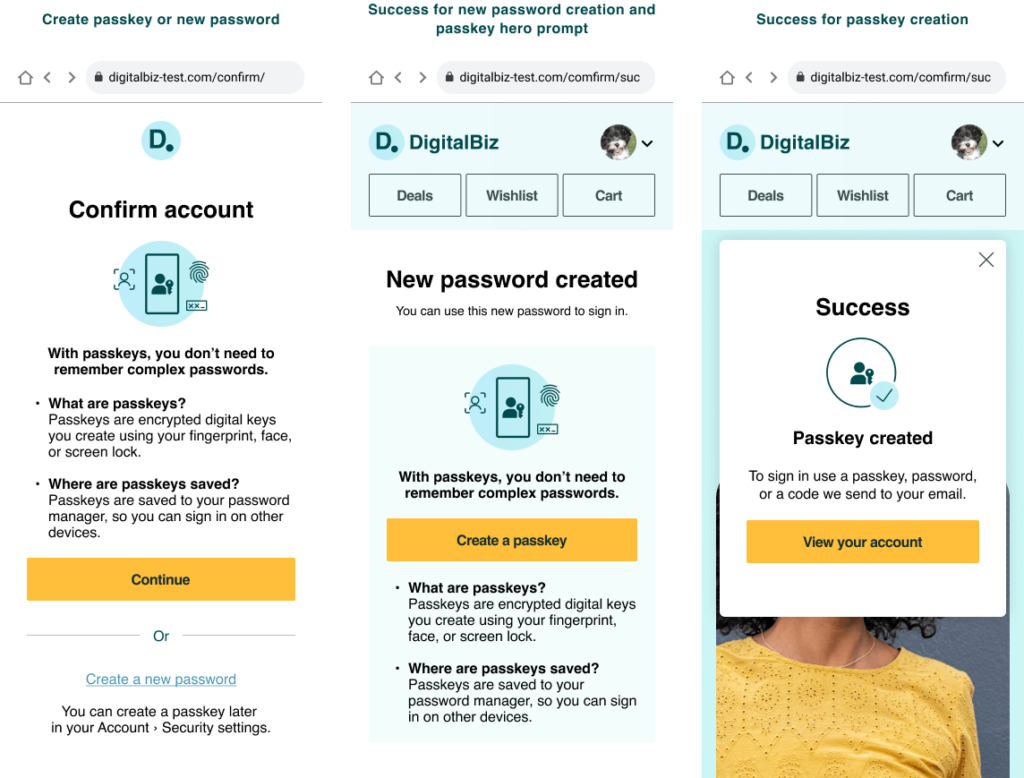
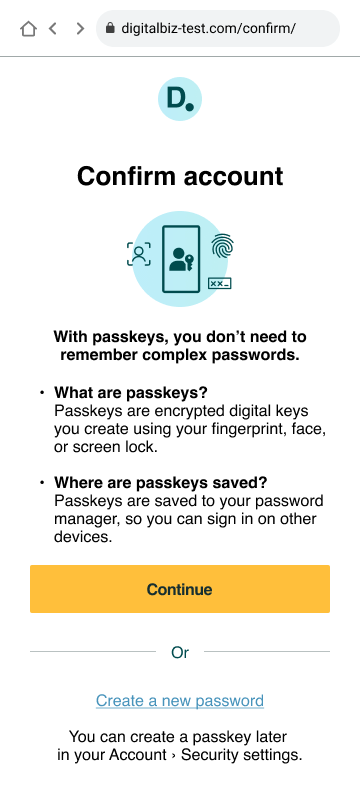
Step 3: Confirm displayed email address to “Create Account.”
Prior to displaying the passkey creation OS dialogs, display a page that emphasizes an account is being created with the email address shown. Use the headline “Create account” and instructional text “Create your account using <email address>” displayed prominently, to prime and reassure people that they’re on the right path toward account creation, prior to encountering the unfamiliar concept of passkeys. Allow the people to confirm or update their unique identifier to help ensure successful account creation.
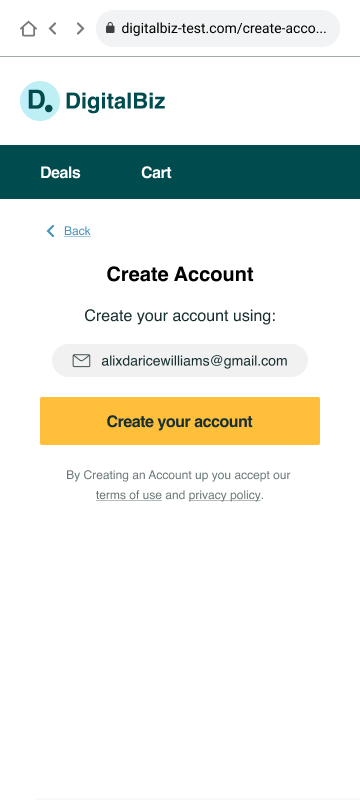
Key Learning: Reassurance from the RP that creating a passkey is part of account creation enhances interest and trust in passkeys.
Evidence
The research indicated that being prompted to create an (unfamiliar) passkey instead of a password violated participants’ expectations about how account creation works. When testing early iterations of the account creation design, we discovered that moving directly from Step 2 (enter email to sign in or create an account) to the unfamiliar “Create a passkey” OS dialog (Step 4), while shorter, was disorienting for participants. It undermined their confidence that they were on the right path to create an account, and led some participants to abandon account creation prior to creating a passkey.
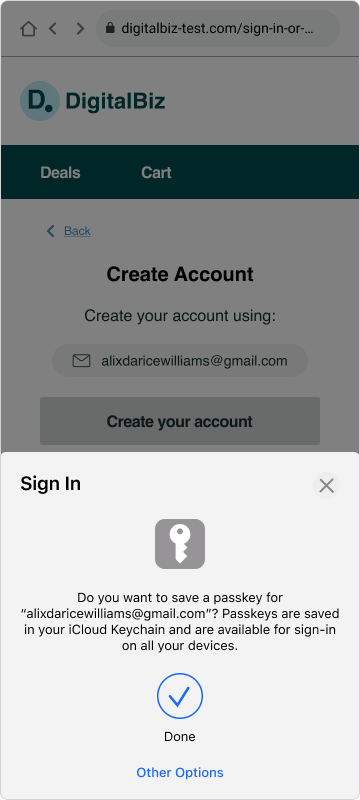
Step 4: Create a passkey for the displayed email address.
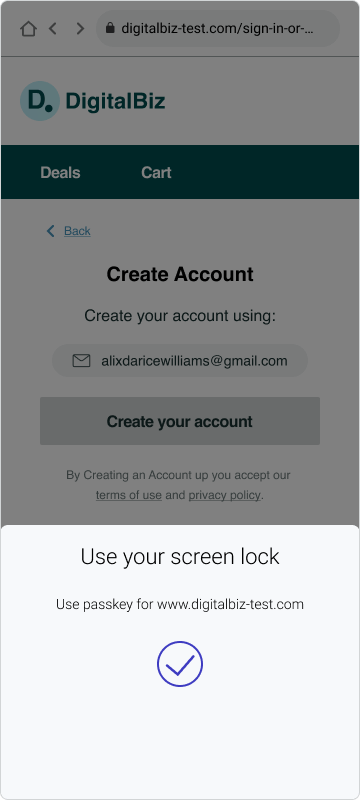
Display the passkey OS dialogs to allow people the choice to create or decline creating a passkey for the specified email. If they opt to create a passkey (by selecting the “Continue” button on Android and the “Confirm” button on iOS), the mobile OS prompts them to use their screen lock to authenticate. Android people can decline to create a passkey by selecting the “Cancel” button and iOS people can decline to create a passkey by selecting the “X” in the upper right of the dialog.
If the passkey creation was successful, a passkey creation confirmation messaging from the OS is displayed, and disappears automatically; no action is needed.
Note: Steps 4a, 4b, and 4c are controlled by the OS (iOS or Android). Because the RP has no control over the design of the OS dialogs, not all Key Learnings will be associated with a guideline.

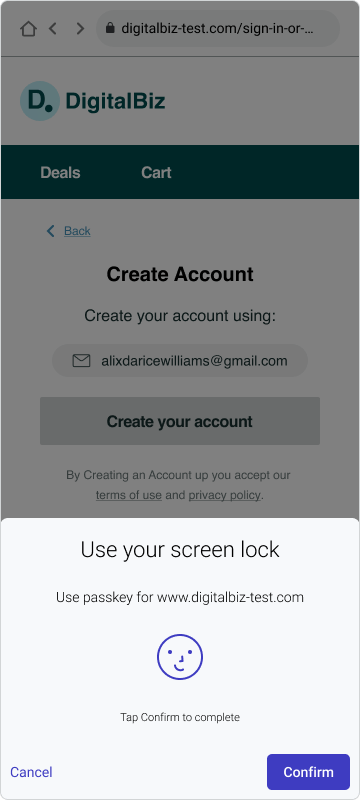

Key Learning 1 of 3: Passkeys are new, but signing in with touch or face was familiar to all and trusted by many.
Evidence
The research indicated that being prompted to create an (unfamiliar) passkey instead of a password violated participants’ expectations about how account creation works. None of the participants had heard of passkeys, and many initially expressed uncertainty about the nature and purpose of a passkey as it related to their new account.
Based on the text and symbols in the “Create a passkey” OS dialogs, most participants inferred that a passkey was a new sign-in option that involved the OS using their device’s authentication system (e.g., face or touch) to confirm their identity instead of a password. For many participants, signing in with face or touch was a familiar and trusted process, perceived to be fast, easy, and secure, based on previous experiences with mobile apps or password managers. Several participants mentioned that signing in with face or touch is fast and easy compared to using a password, and biometrics are unique identifiers that are difficult to hack.
Key Learning 2 of 3: “Screen lock” was an unfamiliar term for many consumers, which made it difficult for PIN, passcode, or pattern people to recognize that passkeys would also work for their current device settings.
Evidence
The research indicated that many participants spontaneously mentioned not knowing what the term “screen lock” meant. This lack of understanding could serve as a barrier to passkey adoption for consumers who use a PIN, passcode, or pattern as a screen lock on their passkeys-eligible devices./h5
Key Learning 3 of 3: Privacy and security concerns are potential barriers to passkey adoption for some consumers.
Evidence
The research indicated that although many participants expressed feeling comfortable creating a passkey based on positive experiences signing in via face or touch on mobile apps, privacy and security concerns led some participants to decline creating a passkey.
Some participants viewed a passkey as single-factor authentication, which they perceived to be less secure than MFA involving a password and a code or link. Other reluctant participants described being uncomfortable using face, touch, PIN, or passcode to sign in to a mobile-based shopping site due to uncertainty about where that information was stored and who might have access to it (i.e., the RP, Apple, or Google). As adoption of passkeys becomes more common, these privacy and security concerns could be addressed through education outside of the account creation process.
Anticipate that some new people who seek to create a new account on your site will decline to create a passkey. For new people who decline to create a passkey, allow passkey creation to gracefully fallback to another authentication model. DigitalBiz gracefully falls back to an email OTP. The graceful fallback option you choose should match your unique security and business goals. [ i ]
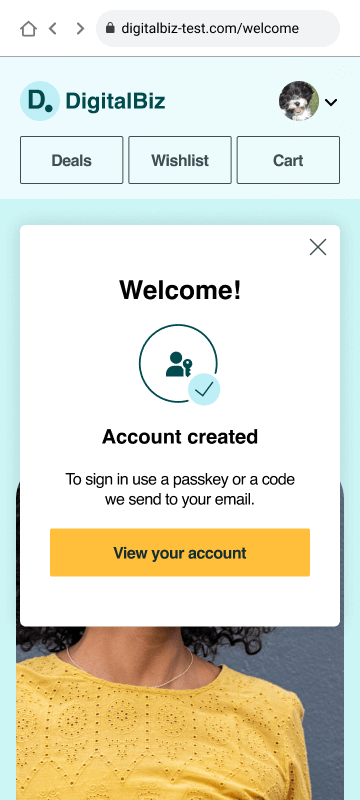
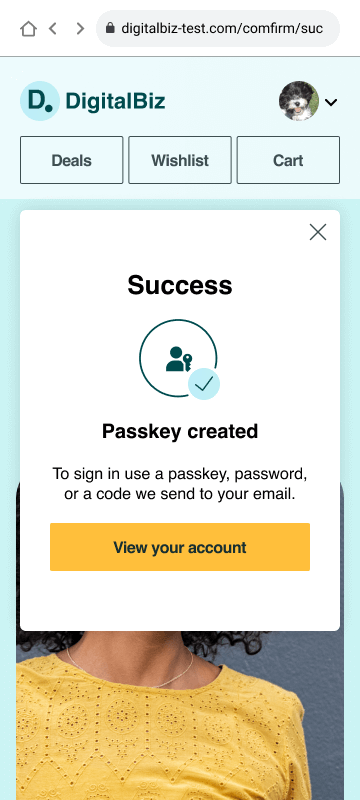
Step 5: Account created confirmation: close overlay or View account confirmation.
For all people, both those who created a passkey and those who declined to create a passkey, display an “Account created” confirmation message via an overlay on top of the homepage, with the authenticated profile icon visible. Lead with a “Welcome” headline that matches your brand voice and tone. At this point, all people, those who opt to create a passkey and those who don’t, are authenticated.
Offer a “View your account” button as the primary action, to navigate people to view information about or disable their new passkey within Settings. List all the sign-in methods available. Display an “X” affordance to close the dialog, to allow people to get started with their site activities as well.
[ i ] To limit or preclude imposters from using a legitimate user’s email address to create the account, we recommend some form of identity proofing as part of new account creation. While DigitalBiz uses email OTPs and magic links, your own security policy and business drivers will determine the method of identity proofing you should use.
Key Learning 1 of 2: Use the proven messages before and after passkey OS dialogs.
Evidence
The research indicated that when passkey creation ended with the OS dialogs only and people were returned to the DigitalBiz homepage in a signed-in state without account creation confirmation messaging from the RP, many participants expressed uncertainty about the status of their account and voiced questions about passkeys and how to access their new account.
Specifically, participants were uncertain whether they had been successful creating a DigitalBiz account, and about the nature of a passkey, including what their sign-in experience would be like without a password on devices where authentication via touch or face was not available. Adding an account creation confirmation screen from the RP was very effective at addressing those concerns.
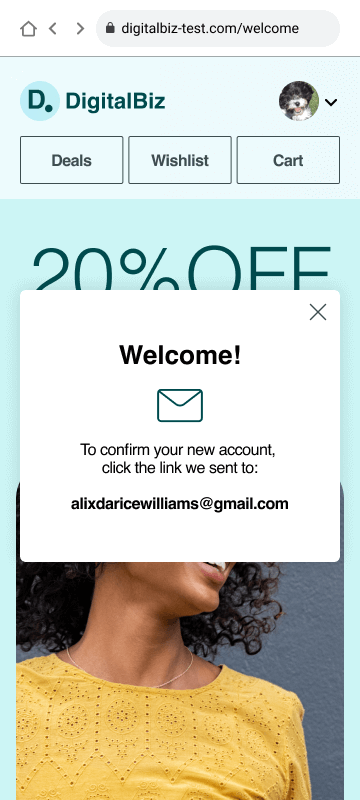
Key Learning 2 of 2: After creating a new account with a passkey (but not a password), participants sought information about how to access their account on devices where their passkey is unavailable.
Evidence
The research indicated that participants who appreciated the ease and convenience of signing in with a passkey on mobile also spontaneously voiced concern about how they might access the new account on another device where touch or face was not available. Adding messaging about sign-in options, i.e., “Sign in with your passkey or a code we’ll send you in email” helped reassure concerned participants that even without a password as a backup authentication method, they could still reliably access this account on another device that doesn’t support their mobile device unlock method. [ i ] While DigitalBiz uses email OTPs and magic links, your own security policy and business drivers will determine the method of identity proofing you should use.
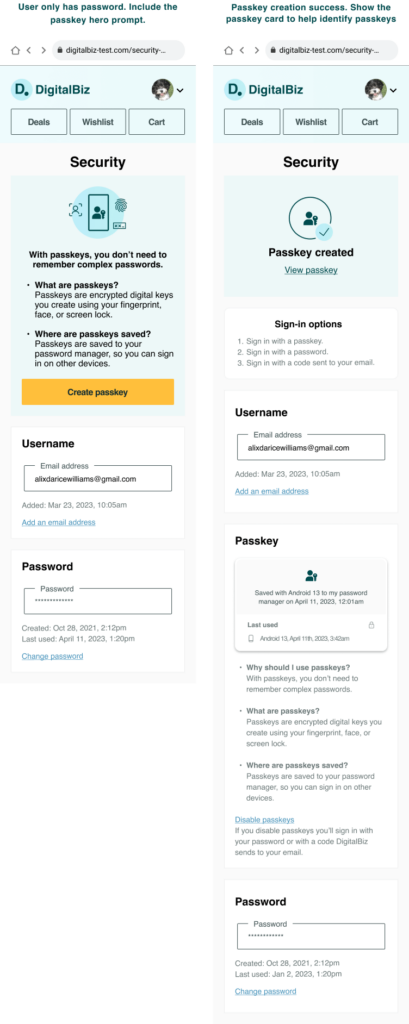
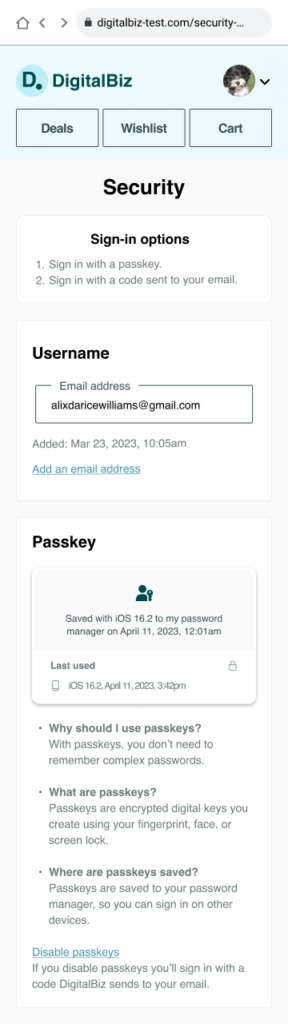
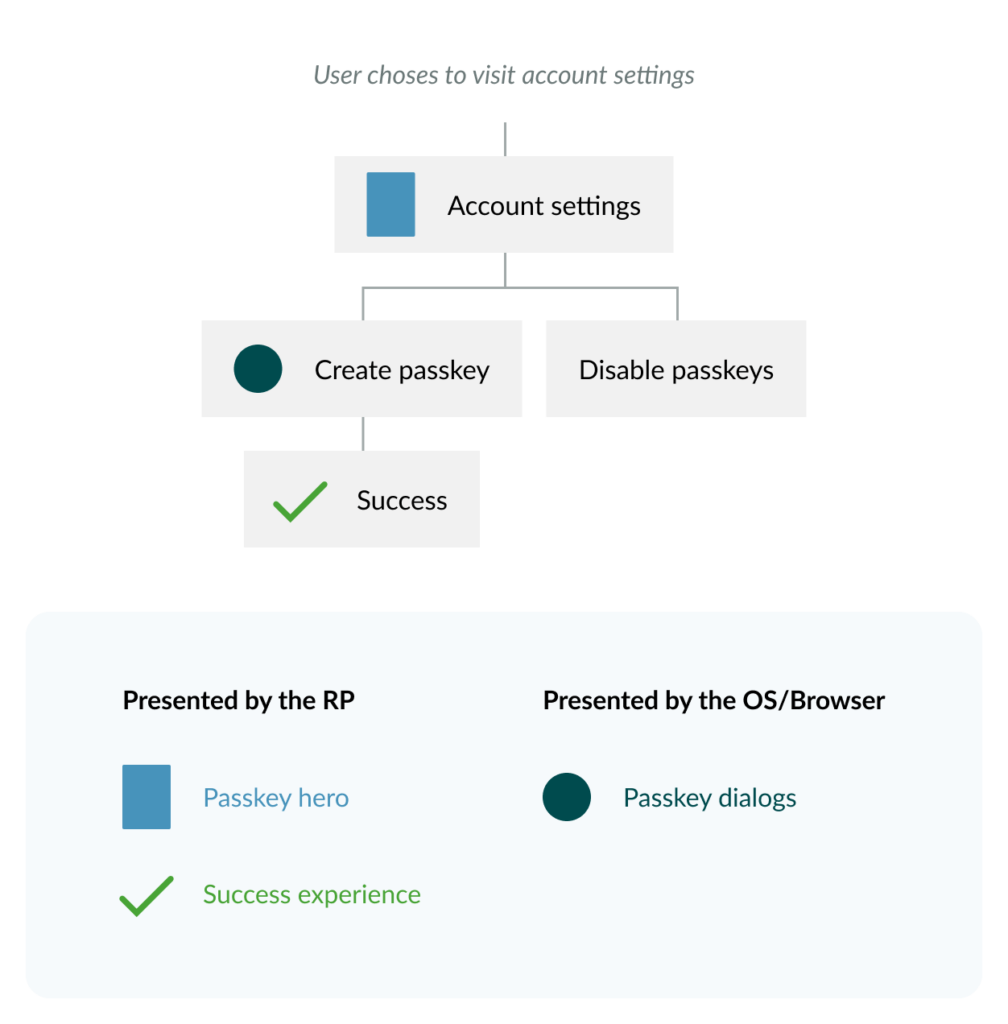
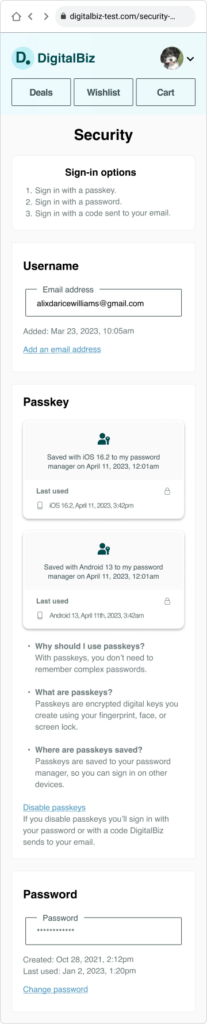
Step 6: View the passkeys “card” in account settings.
If people select the “View account” button in Step 5, navigate to Security Settings. To confirm that a passkey has been created with the new account, display a passkey logo with a check mark as well as the text “Passkey created,” and a link titled “View passkeys” that navigates down the Settings page to the passkeys “card.”
Under the heading, “Sign-in options,” specify all of the methods they have available to authenticate on your site, including a passkey and the alternative method of your choice when a passkey is not available.
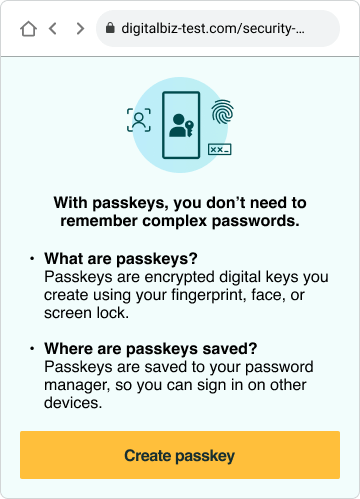
In Settings permanently display messaging that explains why use passkeys, what is a passkey, and where are passkeys saved. This passkeys education messaging includes the following:
Why should I use passkeys?
With passkeys, you don’t need to remember complex passwords.
What are passkeys?
Passkeys are encrypted digital keys you create using your fingerprint, face, or screen lock.
Where are passkeys saved?
Passkeys are saved in your password manager, so you can sign in on other devices.
Provide the option for people to disable passkeys and include messaging that describes how they would access their account after disabling a passkey. For example, “If you disable passkeys, you’ll sign in with your password or with a code DigitalBiz sends to your email.”
Passkeys are a new term, a new visual icon, and a new authentication method for consumers. Whenever possible, help people understand the nature and value of passkeys by comparing them to familiar concepts, visuals, and experiences. For example, Use the passkeys icon (unknown) alongside device icons and a lock icon (known).
Key learning 1 of 2: To educate people about passkeys, associate the unfamiliar (passkeys) with the familiar.
Evidence
The research indicated that people sought to understand the nature of passkeys and why they should use them, but technical explanations often led to confusion, increased concerns, and account creation abandonment. Brief messaging and iconography that compared passkeys to familiar technologies were most effective at providing the right level of information to reassure and give them the confidence to proceed.
Key learning 2 of 2: Some people felt uneasy about passkeys in part because they are abstract and intangible compared to passwords. Making a passkey more tangible via a “passkey card” was an effective strategy for reassuring people about the nature and value of passkeys.
Evidence
The research indicated that participants sought to understand the nature and value of passkeys, but vague or technical explanations often led to confusion and increased concerns. However, the passkey card afforded people an unmistakable object in the interface they can later see in their mind, find later in Account Settings, and use to get helpful information about the passkey.
User journey 2: create a passkey instead of or in addition to a new password during account recovery.
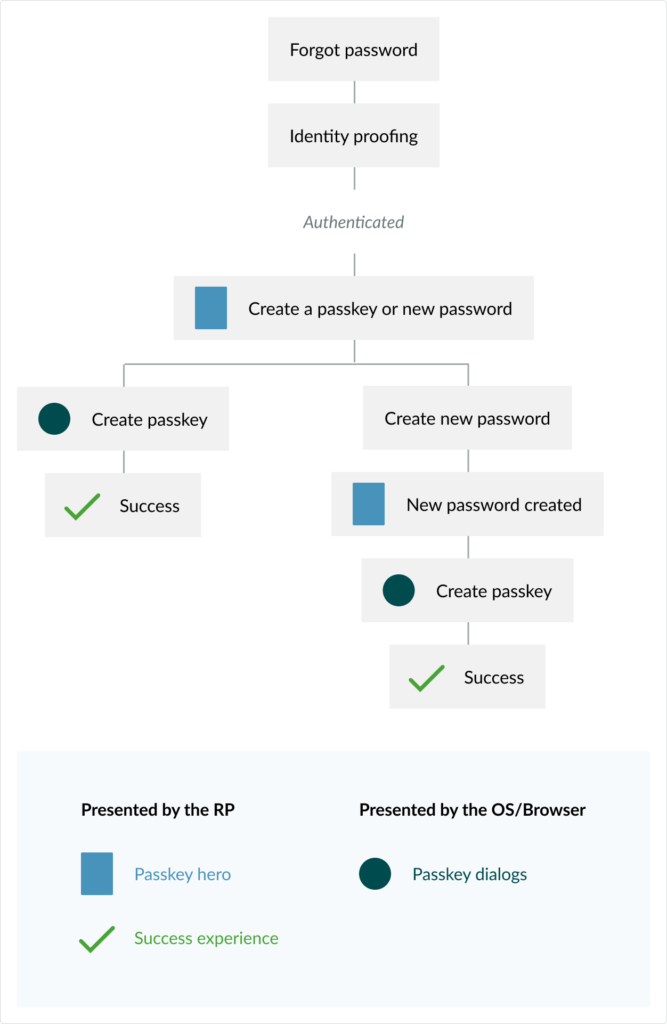
UX Goals: Allow people to create a passkey instead of or in addition to a new password.
- After identity proofing, allow people to create a passkey or new password
- If people create a new password, then allow them to create a passkey, too
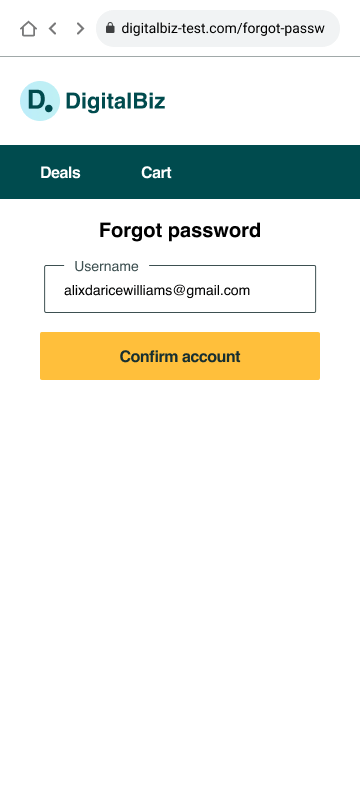
Step 1: Initiate the forgot password experience.
Initiate the forgot password experience with a “Forgot password” link.
Step 2: Use the “Confirm account” call to action from this step onward.
Because this workflow ultimately allows people to create a passkey, use the “Confirm account” call to action from this step forward versus the “Reset password” call to action.
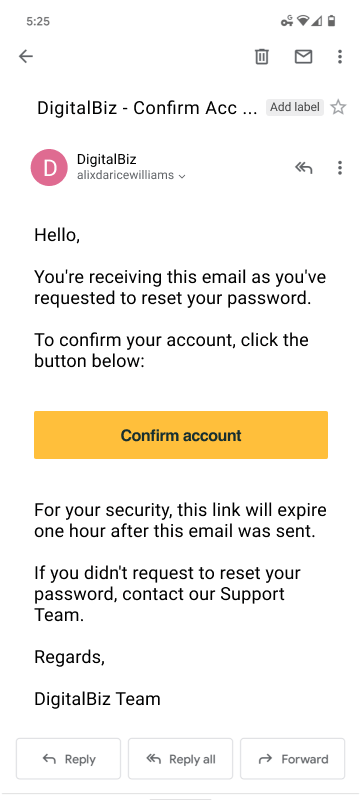
Step 3: Continue with identity proofing.
The DigitalBiz identity proofing process sends an email to confirm their identity. The FIDO Alliance is not recommending any specific method of identity proofing. Your unique security policy and business drivers will determine the method of identity proofing during account recovery. [ i ]
Step 4: Create the new credential (passkey or password).
After identity proofing, offer the choice to create a passkey or a new password.
Promote passkeys as the primary path by using the passkeys hero prompt. Include text to inform people that if they choose to create a new password they can still create a passkey later in Account Settings.
Key Learning 1 of 3: When people are in the mindset of account management and are experiencing friction while trying to access their account, passkey creation feels like a relevant enhancement to that task, rather than an unwelcome interruption or barrier to accomplishing other core site-related tasks.
Evidence
The research indicated that when people considered the new concept of passkeys while imagining the frustrating experience of resetting their password, they anticipated that a passkey not only serves their immediate need of regaining access to their account but will also help them avoid this frustrating and time-consuming password reset task in the future, which enhances their motivation and interest in the new concept of passkeys.
Key Learning 2 of 3: messaging was effective at inspiring participants to create a passkey.
Evidence
Creating a passkey instead of a password was an unexpected choice in the context of the “Forgot password” workflow. Participants expressed appreciation for the brief, simple, and relevant messaging that answered their top questions about passkeys to help inform their decision at the right moment when given the choice to create a passkey or new password.
Key Learning 3 of 3: Compared to new account creation, people with existing passwords might be especially reluctant to give them up. People who already use passwords appreciate the choice to create a passkey, create a new password, or both.
Evidence
The research indicated that participants experiencing an account recovery scenario due to forgot password felt more reluctant to give up their password compared to the scenario of creating a new account, especially if they valued account access on other devices.
In the context of recovering an existing password, being able to reset their password and still create a passkey afterwards was an effective way to entice existing password users to create a passkey.
Step 5a – If “Continue” is selected on step 4, then create a passkey.
Display OS dialogs to allow people the choice to create or decline creating a passkey. If people opt to create a passkey (by selecting the “Continue” button on Android and the “Confirm” button on iOS), the mobile OS prompts them to use their screen lock to authenticate.
People using Android can decline to create a passkey in the OS dialogs by selecting the “Cancel” button and people using iOS can decline to create a passkey by selecting the “X” in the upper right of the dialog.
If passkey creation was successful, passkey creation confirmation messaging from the OS is displayed, and disappears automatically. Then, display the “Passkey created” confirmation.
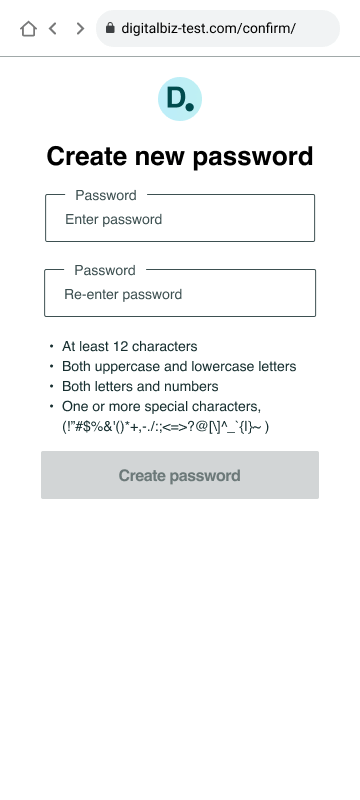
Step 5b: If “Create a new password” is selected on step 4, then create a new password.
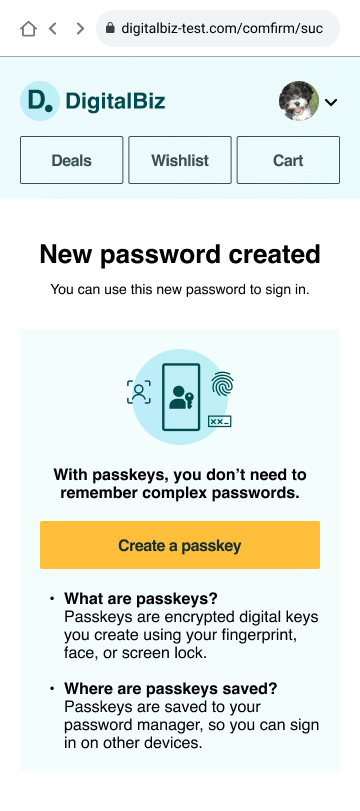
If people choose to “Create a password” on the “Confirm account” page (screen 5), navigate them to a page to create a new password.
Once the new password has been successfully created, navigate them to a “New password created” confirmation page and also promote passkey creation once again using the passkeys hero prompt.
For people who created a passkey, display a “Success” message via an overlay on top of the homepage, with the authenticated profile icon visible. Lead with a “Success” headline that matches your brand voice and identity. Offer a “View your account” button as the primary action, to navigate people to view information about or disable their new passkey within Settings. List the sign-in methods available.
Display an “X” affordance to close the dialog, to allow people to get started with their site activities as well.
Key Learning: Giving up the creation of a new password upon password reset is difficult, even when people value the advantages offered by passkeys. People who already have a password for the website appreciated the ability to reset their password first and also create a passkey after.
Evidence
The research indicated that participants experiencing an account recovery scenario due to forgot password felt more reluctant to give up that password compared to the scenario of creating a new account, especially if they valued account access on other devices. In the context of recovering an existing password, being able to reset their password and still create a passkey afterward was an effective way to entice people who use a password to create a passkey.
Key Learning: Use the proven messages before and after passkey OS dialogs
Evidence
The research indicated that when passkeys are created and people are returned to the DigitalBiz homepage in a signed-in state, that adding a “Success” confirmation screen from the RP was very effective at ensuring people knew the passkey was created and how they can now sign in.
Key Learning: After creating a passkey participants sought information about how to access their account on devices where their passkey is unavailable.
Evidence
The research indicated that participants who appreciated the ease and convenience of signing in with a passkey also spontaneously voiced concern about how they might access the new account on another device where touch or face was not available. Adding messaging about sign-in options, i.e., “Sign in with your passkey or a code we’ll send you in email” helped reassure concerned participants that even without a password, they could still reliably access this account on another device that doesn’t support their mobile device unlock method. [ i ]While DigitalBiz uses email OTPs and magic links as additional sign in options, your own security policy and business drivers will determine what additional authentication methods you should use.
User journey 3: create, see, and manage passkeys in account settings.
UX Goals: Allow people to create, see, and manage passkeys.
- If a passkey doesn’t exist for this person: include the passkeys hero prompt at the top of Account Settings.
- If passkeys exist for this person: allow them to see it as a “card”. One card per passkey.
- If passkeys exist for this person: place the passkeys UI above passwords in the interface.
- If passkeys exist for this person: offer the ability to disable passkeys.
If a passkey doesn’t exist for this person: display a passkeys hero prompt at the top of Account Security settings.

If a passkey exists for this person: display passkey cards (one per passkey), information about passkeys, and actions for passkeys.
Key learning: Most participants appreciated the option to create a passkey to update their existing account at any point within Account Settings. Most participants described Account Settings as an intuitive and useful place to proactively learn about and update authentication settings.
Evidence
The research indicated that participants sought to understand the nature and value of passkeys, but vague or technical explanations often led to confusion and passkey creation abandonment. However, familiar biometric iconography and brief messaging that compared passkeys to familiar technologies was most effective at providing the right level of information to inform participants about passkeys and give them the confidence to proceed with using this unfamiliar technology. For people who already have a passkey, the passkey card(s) affords then an unmistakable object in the interface they can later see in their mind, find later in Account Settings, and use to get helpful information about the passkey.
User journey 4: sign-in with a passkey.
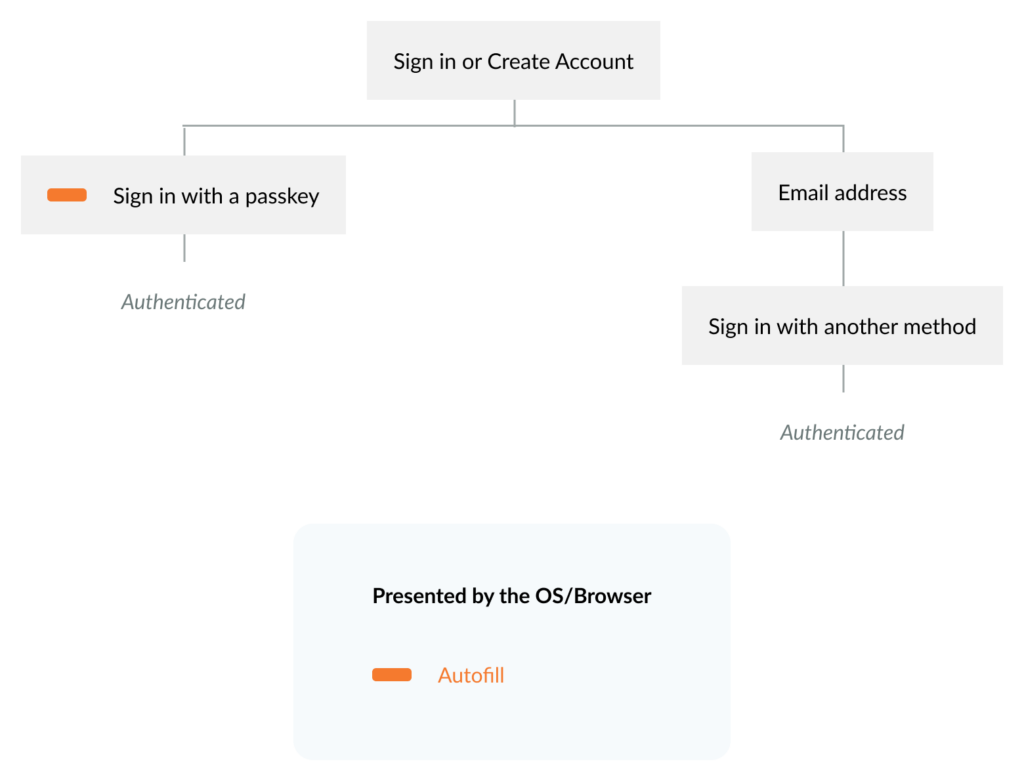
UX Goals: Allow people to sign in with a passkey and other methods.
- Enable autofill by adding autocomplete=”webauthn” to the username input field. This allows people to use their password manager to quickly and easily sign in with their passkey
- Support graceful fallback to other sign in methods. Allow people to enter another identifier (e.g. DigitalBiz uses email address) to sign in or create an account.
Our research explored participants’ success and satisfaction with a dedicated “Sign in with a passkey” link, buttons, and autofill. Our testing indicates that autofill ensured the highest success for people to sign in with a passkey.
Step 1: Sign in or Create account button.
Key Learning: On the homepage, offer one affordance for both sign-in and account creation.
Evidence
The research indicated that the action of creating an account was more discoverable on DigitalBiz when the sign-in and account creation options were combined, rather than surfacing the account creation option after people opted to sign in. In addition, some participants reported that occasionally they are uncertain whether they have an account, and a multipurpose button serves their needs.
Step 2: Sign in or create account page – support autofill.
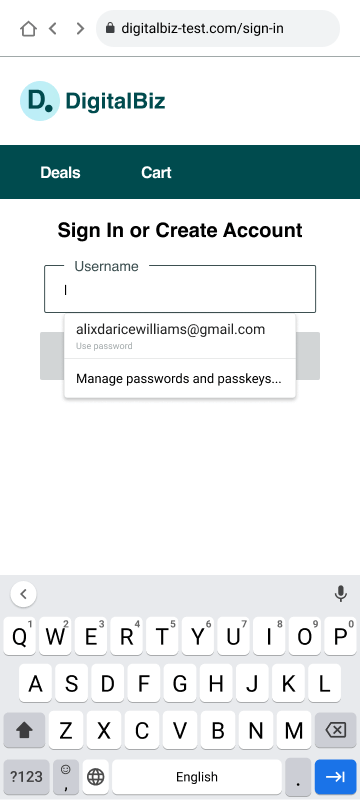
Key learning 1 of 2: Autofill makes passkey sign in delightfully fast and efficient.
Evidence
The research indicated when autofill was enabled, participant responses to signing in with a passkey were overwhelmingly positive. The most frequently used adjectives to describe signing in with a passkey with autofill were “simple, fast, efficient, and seamless”.
About the guidelines
Questions and feedback about this document
If you’re a service provider deploying passkeys or creating products that support passkeys in the marketplace, we want to hear from you and get your feedback on your experiences, these UX Guidelines, or anything else you’d like to share. Please get in touch with us at info@fidoalliance.org
Purpose of this document
This is the FIDO Alliance’s third compendium of UX Guidelines. The passkeys UX guidelines in this document are meant to accelerate decision-making during FIDO deployments and facilitate rapid, well-designed, and usable implementations of passkeys. This document provides the user experience (UX) guidelines and best practices for relying parties (RPs) and implementers seeking to enable synced passkeys for consumer-oriented websites based in non-regulated industries. For UX guidance on FIDO deployments leveraging device-bound passkeys, please see the FIDO Security Key UX Guidelines.
Audience of this document
The guidelines are practical strategy, design, and content messaging resources for product, design, and development leads at service providers who want to create passkeys demos prior to developing and deploying at scale. The guidelines, along with the Figma UI Kit, aim to accelerate decision-making and reduce the work needed by service providers to design and develop their own demos and deployments of passkeys and streamline implementation processes.
Desired outcomes as a result of the content in this document
- Reduce or eliminate new account creation with passwords.
- Learn which touchpoints in the customer journey are optimal for building a passkeys strategy.
- Optimize passkeys adoption and reduce password recovery processes.
- Increase passkeys adoption and successful creation of passkeys.
- Enable existing customers to use passkeys instead of passwords.
- Reduce the time and costs with re-usable UX patterns proven through formal usability research.
- Accelerate passkeys work by using the FIDO Alliance Figma UI Kit to create your own prototypes.
- Accelerate passkeys work by lifting from the passkeys content principles and match to your needs.
About the scope
Scope of the research that provided evidence for the guidelines
Four rounds of iterative, moderated consumer interviews were conducted with 26 participants in total, using clickable Figma prototypes depicting a model for creating and signing in with passkeys. Early rounds of interviews also included a live demo website for sign-in using hybrid on Windows 10+ machines in conjunction with Android and iPhone mobile phones.
In collaboration with the FIDO Alliance User Experience Working Group (UXWG), a research and design agency called Blink UX conducted this research remotely via Zoom with consumers across the U.S. Study participants included consumers ages 18-60, with mobile devices supporting passkeys for sign in (i.e., iPhones running iOS 16, or Android phones running OS 9 or later). All participants had enabled a screen lock on their phones (i.e., a PIN or passcode, face, or touch) and used mobile Safari, Chrome, or Edge as their primary browser. Two participants, one who uses iPhone and one who uses Android, were blind or had low vision, and used their devices’ native screen reader (Talkback or Voiceover) to navigate and consume content on mobile web, using a live DigitalBiz test site, enabled with support for FIDO and passkeys.
Note that these UX recommendations are optimized for browser-based sites rather than native mobile apps.
The design and messaging recommendations in this document were developed after several months of investigation, research, and collaboration among members of the UXWG, including audits of well-known passkeys deployments, interviews with platform providers and brands that have developed passkeys, and four rounds of iterative UX research.
During the course of these investigations, the UXWG initially identified 50+ possible touchpoints where RPs could prime and educate people about the new concept of passkeys, allow people on mobile web to create accounts with passkeys and add passkeys to existing accounts, or sign in with passkeys on multiple devices and platforms.
In the context of UX, priming means designing an interface that employs messaging and visuals that subtly influence and guide the customer toward a certain action. Priming is used to make the experience intuitive without providing explicit instructions, which contributes to the feeling of delight with an experience.
Security policy is out of scope for these guidelines
The guidelines focus on UX concepts that are unique to FIDO with synced passkeys. You will see various forms of identity proofing and non-FIDO authentication examples throughout this work. The guidelines do not intend to prescribe security guidelines for identity proofing or other non-FIDO authentication mechanisms as they are unique to each RP and based on their own unique business needs and security policy. Throughout the guidelines, look for this symbol [ i ] which indicates where your own security policy and business drivers come into play.
Customer journey touchpoints researched
The UXWG identified over 50 possible touchpoints for passkeys on the customer journey. Through early audits and discussions to consider in more detail, the UXWG identified 18 touchpoints to test, including prompting all people who sign in with a password to create a passkey, hybrid sign-in, and passkeys-related marketing, and customer support messaging. After conducting multiple rounds of collaborative and divergent ideation, observing and listening to people in the first two rounds of testing, and synthesizing insights from their investigations, the UXWG identified nine touchpoints to focus on where people are most receptive to creating and signing in with passkeys. These nine account-related touchpoints are the focus of these guidelines.
- Create account with a passkey on iOS
- Create account with a passkey on Android
- Create a passkey on iOS from Account Settings
- Create a passkey on Android from Account Settings
- Create a passkey on iOS during account reset due to forgot password
- Create a passkey on Android during account reset due to forgot password
- Sign in with a passkey on the same iOS device for which the passkey was created
- Sign in with a passkey on the same Android device for which the passkey was created
- Affordances for disabling passkeys
About the authors and underwriters
Why FIDO?
Internet and mobile technologies have revolutionized how we communicate, transact, and deliver services. But these advances also created a problem — an overreliance on frustrating and risky passwords to authenticate people of online services.
In 2012, several thought-leading organizations and individuals came together to form the FIDO Alliance. The Alliance’s mission is to create standards for simpler and stronger modern authentication methods and foster their widespread adoption. Some of the FIDO Alliance’s successes include:
- Published standards for strong, phishing-resistant authentication based on public key cryptography
- Worked with the World Wide Web Consortium (W3C) to establish FIDO technology as an official web standard, which is now built into billions of device browsers and platforms
- Established certification tools, processes, and global workshops to facilitate solution development and interoperability testing
- Achieved global endorsement of the FIDO standards-based approach for many of the world’s leading consumer electronics manufacturers and web services brands
- Introduced passkeys to broaden scale for FIDO authentication, gaining extended support across operating systems and relying parties
Given these successes and the growing global recognition of FIDO Authentication, products and services that are marked with FIDO logos are associated with phishing-resistant, interoperable, and human-friendly authentication.
About the FIDO Alliance
The FIDO (Fast Identity Online) Alliance, www.fidoalliance.org, is an open industry association with a focused mission: authentication standards to help reduce the world’s overreliance on passwords.
The FIDO Alliance is working to change the nature of authentication with open standards that provide sign-in experiences that are more secure than passwords and SMS OTPs, simpler for consumers to use, and easier for service providers to deploy and manage. FIDO Authentication is stronger, more private, and easier to use when authenticating to online services.
The Alliance is driven by hundreds of global technology leaders across enterprise, payments, telecom, government, and healthcare that have come together in support of the organization’s mission to reduce the world’s reliance on passwords. Alliance members contribute to this mission by influencing the development of FIDO specifications, establishing best practices for deployment of FIDO Authentication, and driving global awareness of the Alliance, its mission, and the FIDO specifications.
About passkeys
Passkeys are a password replacement that provide faster, easier, and more secure sign-ins to websites and apps across a people’s devices. Unlike passwords, passkeys are resistant to phishing, are always strong, and are designed so that there are no shared secrets.
They simplify account registration for apps and websites, are easy to use, work across all of a people’s devices, and even other devices within physical proximity.
From a technical standpoint, passkeys are “discoverable” FIDO credentials for passwordless authentication. The cryptographic keys are used from people’s devices (computers, phones, or security keys) that are used for secure authentication.
Passkeys that are managed by phone or computer operating systems are automatically synced between the person’s devices via a cloud service. The cloud service also stores an encrypted copy of the FIDO credential. Passkeys can also by design be available only from a single device from which they cannot be copied. Such passkeys are sometimes referred to as “device-bound passkeys.”For example, a physical security key or computer platform could contain multiple device-bound passkeys. The UX research and resulting guidance in this document cover synced passkeys.
The word “passkey” is a common noun; think of it the way you would refer to “password”. It should be written in lowercase except when beginning a sentence. The term “a passkey” (and plural form “passkeys”) is a cross-platform general-use term, not a feature tied to any specific platform.
About the FIDO Alliance UX Working Group (UXWG)
As companies around the world accelerate their move toward passwordless authentication based on FIDO standards, the topic of user experience has risen to the forefront. Simply put, if the UX isn’t sufficient, consumers will be slow to adopt passkeys as a password replacement, and people will find workarounds. Furthermore, MFA is no longer just being viewed as a security or bottom-line remit. It is clear that a better authentication user experience can drive top-line growth by enabling quicker and more seamless access to online services and engendering stronger brand affinity.
In order to accelerate adoption of FIDO solutions and achieve the FIDO Alliance’s vision of helping reduce the world’s overreliance on passwords, the UX Working Group (UXWG) serves as subject matter experts and internal advisors within the FIDO Alliance on issues related to usability and UX.
The FIDO Alliance UXWG is composed of 79 people from 31 companies. The Chair of the UXWG is Kevin Goldman. All UXWG members at the time of publication include:
Matt Davey , AgileBits, Inc. dba 1Password | Benji Debnam , AgileBits, Inc. dba 1Password | Travis Hogan , AgileBits, Inc. dba 1Password | Michael Horne , American Express | Sue Koomen , American Express | Ricky Mondello , Apple Inc. | Mitchell Armenta , Axiad IDS, Inc. | Jing Gu , Beyond Identity, Inc. | Bekki Lee , Beyond Identity, Inc. | Abbie Barbir , CVS Health | Paul Ivanivsky , CVS Health | Cisa Kurian , CVS Health | Neal Shah , CVS Health | Julia Chagnier , Dashlane | Rew Islam , Dashlane | Hugo Leloup , Dashlane | Matthew Miller , Duo Security, Inc. | Sierre Wolfkostin , Duo Security, Inc. | Dirk Balfanz , Google Inc. | Christiaan Brand , Google Inc. | Silvia Convento , Google Inc. | Mitchell Galavan , Google Inc. | Court Jacinic , Google Inc. | Rebecca Shareff , Google Inc. | Qingjie Du , HYPR | Paul Tunick , HYPR | sarah zimmers , HYPR | Sunil George , IBM | Shane Weeden , IBM | George Huszar , Idemia | Allyson Wagner , Idemia | Elizabeth Beasley , Intuit | Rakan Khalid , Intuit | Yuting Liao , Intuit | Calvin Ma , Intuit | Arim Yoon , Intuit | Judy Clare , JP Morgan Chase Bank, NA | Julia Trinidad , JP Morgan Chase Bank, NA | Robert Warne , JP Morgan Chase Bank, NA | Tatsuya Karino , Mercari, Inc. | Kotaro Oi , Mercari, Inc. | Ellis Clarke , Meta | Yao Ding , Meta | Shengfei Gu , Meta | Jinjing Song , Meta | Tim Cappalli , Microsoft | James Hwang , Microsoft | Jackie Comp , Nok Nok Labs | Vittorio Bertocci , Okta, Inc. | Amit Bhatia , PayPal | Phil Catalfamo , PayPal | Lisa Grossi , PayPal | Matt Welsh , PayPal | Jongsu Kim , Samsung Electronics Co. | Cam Champeau , Sony Group Corporation | Manish Khedawat , Target Corporation | Tom Sheffield , Target Corporation | JAEBEOM KIM , Telecommunications Technology Association | Kevin Goldman , Trusona, Inc. | Andrew Ward , Trusona, Inc. | Stephen Oh , TrustKey | Lissa Crosby , U.S. Bank | Pamela Degnan , U.S. Bank | Christina Devine , U.S. Bank | Leslie Johnson , U.S. Bank | Dan Lundeen , U.S. Bank | Courtney Markuson , U.S. Bank | Michael Toth , U.S. Bank | Amanda Willis , U.S. Bank | Patrick Leahy , VMware | Joyce Oshita , VMware | Ginny Ellsworth , Wells Fargo | Bob Farrigan , Wells Fargo | Gavin Fung , Wells Fargo | Nithya Srinivasan , Wells Fargo | Amy Ulrich , Wells Fargo | Yueh Chin , WiSECURE Technologies | Blake Henson , Yubico | Arthur Law , Yubico
About the underwriters of the guidelines
FIDO Alliance is a 501(c)(6) non-profit organization. Hiring an independent, third party UX research firm incurs costs. Three FIDO Alliance member companies contributed to underwrite the costs of this research. We’d like to thank 1Password, Google, U.S. Bank, and Trusona for their financial support to help make this work possible.
Related resources
These guidelines should be used in tandem with other FIDO Alliance publications including FIDO’s Logo Usage Guidelines, FIDO Privacy Principles, Guidance for Making FIDO Deployments Accessible to people with Disabilities, the FIDO Alliance Design System, passkeys.dev, and other technical documentation. All the human interfaces included in this document can be found as fully editable Figma Components in the FIDO Alliance Figma UI Kit.
Device, operating system, and browser support for FIDO protocols will change over time. Should you encounter difficulties during your implementation of passkeys, please take advantage of online resources such as the FIDO-dev mailing list or by simply contacting FIDO Alliance via email.